Wednesday, July 15, 2009

Correct/ Copy Journal Entries

Correcting posted entry made easy in Dynamics GP. You can reverse a journal entry automatically by clicking Correct and select Back Out a Journal Entry.
Select the year and journal entry number (or type in JE number). Click Ok.
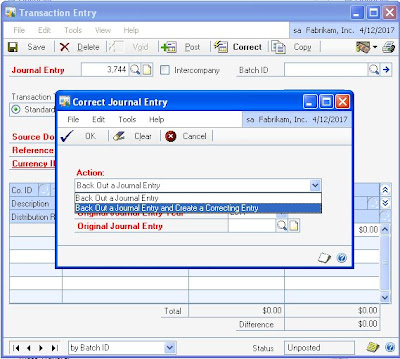


You can reverse and replace if you select Back Out a Journal Entry and Create a Correcting Entry.

The first entry created is the backout entry. When you post or save the backout entry, a second entry is created. This second entry is your original entry as a new, unposted JE that you can make changes to.

You can also copy a posted journal entry and use it as a template. Click Copy and follow the same steps in correcting entry.


Tips:

If you know the JE number, it is better to type it in. It may take time if you browse it from lookup button. Back out entries are not allowed to back out. Once it is posted you will reverse it manually. Please make sure you review before posting a back out entry.

Change Column Titles in Smartlist

You can change the column display name in Smartlist. For example, from column name "QTY Allocated" to "Quantity Allocated".

Here is how...
  1. Open your smartlist query

  2. Click Columns button

  3. Highlight an item you want to change and save it as favorite

Please make sure you have your own copy of Smartlist query before making any changes. Other users might have access to it as well.


Tips:

This is useful if you end up changing the column titles whenever you export to Excel.


Dynamics GP window notes

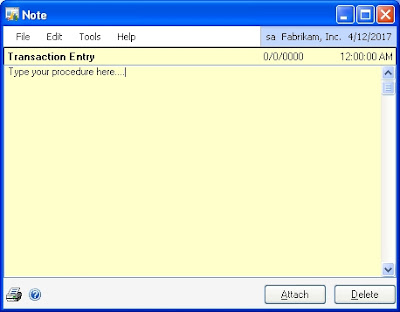
Having difficulty remembering steps how to make entry in GP? You can try window-level notes.


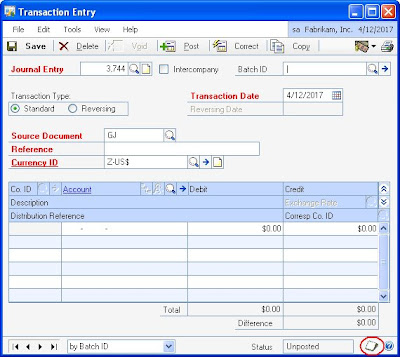
Click on Dynamics GP window notes.


Click Attach. Once a window note has information saved, the note button appearance changes with yellow lines. Window note button is available in any window within Dynamics GP.


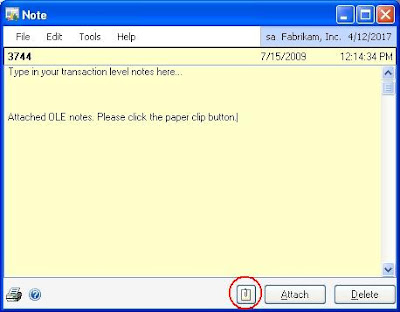
Transaction-level notes is different from window-level notes. In my sample screenshot, another note button is available next to Journal Entry number 3744.


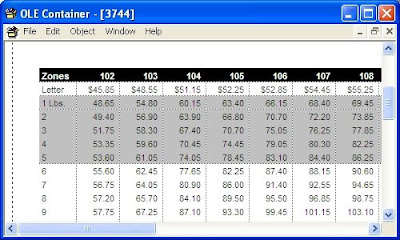
You can attach links to documents or images within the Note window. For example, you can attach customer payment overdue notices to a customer note, or attach an image of an inventoried item to an item note.


If an attachment is linked to the note, the "paper clip" on the button will appear to contain a note. If an attachment isn't linked to the note, the paper clip will appear empty.

Note:

Attachments are available only for record-level notes, not window-level notes.
Attachments are stored in the location specified in the OLEPath= line of the Dex.ini file.


Friday, July 10, 2009

FRx 6.7 Bug on service pack 10

FRx Row Format usually includes Currency Symbol using CS print control option. If the currency amount is set to Whole Dollars, the amount still shows with decimal places. Microsoft says this is due to change that was made on CS functionality.

Tips:
The workaround is to use the format mask.
It should look like this... 130 TO 160 "$0,000;($0,000)"

Microsoft will fix this issue on the next service pack release but no definite date yet.

Thursday, July 9, 2009

FRx Reports as Email Attachment

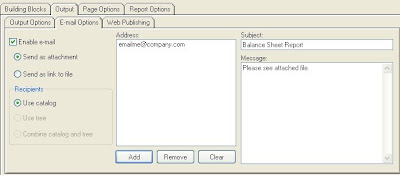
Microsoft FRx Report can be sent automatically as email attachment. Each time you click generate reports, the system will send email to your list of recipients.


Procedure:


  1. Click Output Tab >> Output options - make sure it is set to FRx Drill Down Viewer

  2. Click Output Tab >> E-mail Options - mark Enable e-mail, mark Send as attachment, mark Use catalog

  3. Address: Click Add. Type e-mail address on "add individual user". Click Add and then Ok.

  4. Subject - it could be name of your report

  5. Write your Message

  6. Verify your report date

  7. Click Generate Report

No report will be shown on screen because it will appear as your attachment.


Tips: This process is paper less. You will save time printing all reports and sending hard copies. You may want to test this first using your email address to verify if your setup is correct.

Monday, July 6, 2009

How to change Batch ID in GP?

If you have an existing transaction saved in a batch, you don't have to delete your existing transaction entry to be able to change your Batch ID.


All you need to do is create a NEW batch ID to replace the old.


The Old batch ID will have zero number of transactions and ready to be deleted.

Tips: It is recommended to use Batch ID naming convention like user Initial+ Date. To review your transactions, please print an edit list before posting by going to Batch window >> Click the print icon.

Sunday, July 5, 2009

How to Print Security Report in GP

When dealing with security, it is very important to an IT professional to have strong security reports, since this is a leading topic during audits, and it can save a lot of time from an administration aspect to have security information readily available.

Go to Reports >> System >> Security >> select Security Role Assignment.

Click New, then in the Options window enter an Option name of “ALL”. Set the destination to Screen and save the Security Report Option without entering any restriction. Close the Option window and Select All and Insert it into the Print List window.

This report will show you Role ID’s with all users assigned to the Role ID.

Tips: There are several other useful reports specific to Tasks, Roles, unassigned security operations, and a comprehensive User Security report.

Saturday, July 4, 2009

Remove Security Setup Records


During Dynamics GP10 upgrade, you may choose to convert your user security. This creates a unique role and task for each of your existing users during the upgrade.

The Remove Security Setup Records utility provides an easy way to delete those records, if desired, if you decide to gradually transition completely to the new security system. This will allow you to have a clean system without tasks and roles that are no longer used.

Under the Utilities section of the Administration Area Page, click on Remove Security Setup Records.


Specify your From/To range and then click Process.


Tips: Dynamics GP10 Security Task and Role allows you to copy a template from existing pre-defined security task and role. Please make a backup of database before making any changes.

Friday, July 3, 2009

Dynamics GP10 Toolbars


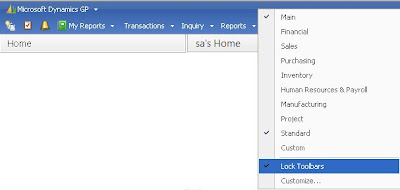
You can move the main Dynamics GP toolbars to make your navigation more convenient. You can play around with it anytime as it is user specific setup.


Right click on the main tool bar (blue area), unmark Lock Toolbars.

Start to drag and drop the fields.


Once you are satisfied with their position, mark the "Lock Toolbars". In my example, I moved Microsoft Dynamics GP to the right, second row and report icons to the left.


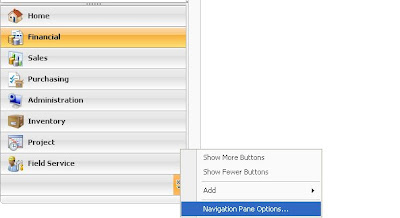
You can also remove unnecessary series home page like Field Service, Project, Inventory, etc. if you are not using them. This will give more room on your navigation pane.


Click the bottom yellow arrow >> Navigation Pane Options >> Unmark the checkboxes of display series button.


Tips: Maximize the use of Series homepage. It shows you all navagation menu for Transactions, Inquiry, Reports, Cards, Routines and Setup. You can click the show and hide button on each menu to save time scrolling up and down to see other fields within your screen.


Thursday, July 2, 2009

Dynamics GP Service Packs


It is important to know your software version. When you contact GP support, you’ll need your version information including information about service packs.

To know the current software version installed, please click on Help >> About.


Dynamics GP 7.0

Service Pack 1 = 7.00g5
Service Pack 2 = 7.00g12


Dynamics GP 7.5

No Service Pack = 7.50g3
Service Pack 1 = 7.0g10
Service Pack 2 = 7.5g16
Service Pack 3 = 7.5g26
Service Pack 4 = 7.5g30
Service Pack 5 = 7.5g43
Service Pack 6 = 7.5g53
Service Pack 7 = 7.5g66


Dynamics GP 8.0

No Service Pack = 8.00g7
Service Pack 1a = 8.00g19
Service Pack 2 = 8.00g34
Service Pack 3 = 8.00g44
Service Pack 4 = 8.00g63
Service Pack 4a = 8.00g64
Service Pack 5 = 8.00g73


Dynamics GP 9.0

No Service Pack = 9.00.0114
Service Pack 1 = 9.00.0259
Service Pack 2 = 9.00.0281
Service Pack 3 = 9.00.0310
Service Pack 4 = 9.00.0352


Dynamics GP 10.0 (the latest)

No Service Pack = 10.00.0774
Service Pack 1 = 10.00.0903
Service Pack 2 = 10.00.1061
Service Pack 3 = 10.00.1193
Service Pack 4 = 10.00.1237

Download Link to get the latest update:
Service Pack, Hotfix, and Compliance Update Patch Releases for Microsoft Dynamics GP 10.0

Tips: Planning on upgrade is important. Consider the dates, hours, and people involved. Print a sample layout of all modified (customized) reports to be compared before and after upgrade including critical reports like Trial Balance and Financial Statements. To save time, you can consider those additional modules you want to implement so it would be included during the install.

Wednesday, July 1, 2009

FRx Reporter Service Packs


FRx have released versions of service packs for fixes.
To know your current FRx version, please click Help > About.

FRx 6.5

Service Pack 1 = 6.5.38
Service Pack 2 = 6.5.51
Service Pack 3 = 6.5.84
Service Pack 4 = 6.5.152
Service Pack 5 = 6.5.184
Service Pack 6 = 6.5.199
Service Pack 7 = 6.5.246


FRx 6.7

Service Pack 1 = 6.7.1013
Service Pack 2 = 6.7.2013
Service Pack 3 = 6.7.3073
Service Pack 4 = 6.7.4031
Service Pack 5 = 6.7.5014
Service Pack 6 = 6.7.6062
Service Pack 7 = 6.7.7032
Service Pack 8 = 6.7.8069
Service Pack 9 = 6.7.9111
Service Pack 10 = 6.7.10343 (the latest)


Tips: Backup your SysData Folder at least once every quarter especially before updating your service pack. Usually FRx SysData is under GPShare Folder.

Service pack 9 (windows vista compatible) must be installed before upgrading to service pack 10.